Cats vs Dogs Classification using CNN Keras
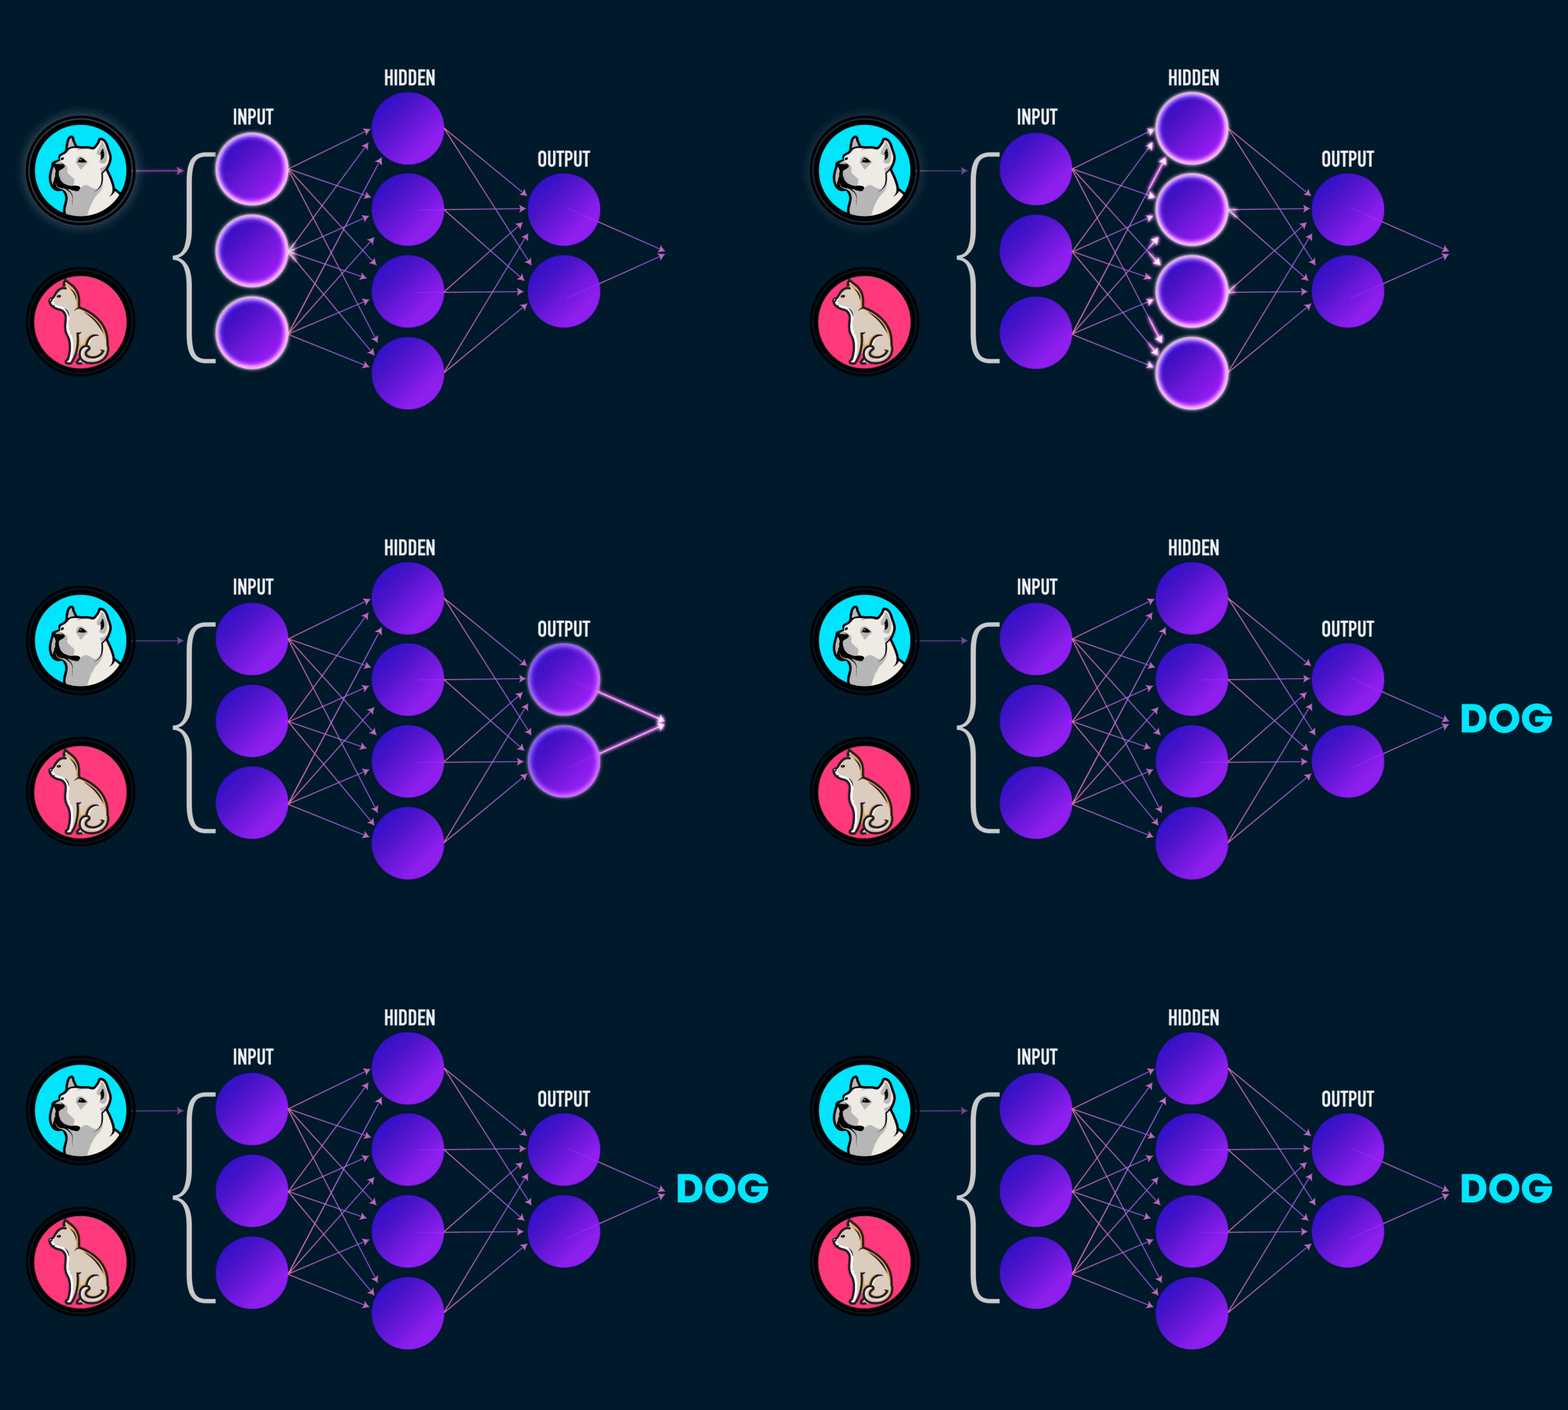 Image from analyticsindiamag.com
Let’s go quickly to the main problem the initial requirement needs a classification image of objects in this case Cat and Dog. Instructional articles how to develop a Deep Convolutional Neural Network Step-by-Step to Classify Photographs of Dogs and Cats. The entire code is uploaded at Github. If you are only interested in notebooks, here it is Notebook. Vietnamese version can be read at Vie.
Steps to build Cats vs Dogs classifier
If you don’t have jupyterlab you can build it following the instructions below using docker-compose or vice versa, skip this step.
# clone repo and start jupyterlab by docker-compose
git clone https://github.com/dnguyenngoc/lab-spark.git \
    && cd lab-spark \
    && docker-compose -f docker-compose-only-lab.yaml up
After execute command docker-compose up, All service online (it may take a while before everything is up and running).
| Service     | URL                   | Password               |
|-------------|-----------------------|----------------------- |
| Lab         | http://localhost:8888 | 1q2w3e4r               |
Access to http://localhost:8888 and using password 1q2w3e4r to login. full notebook can be read at Cats vs Dogs Classification using CNN Keras.ipynb
1. Import Libraries
import os
import cv2
import zipfile
import random
import glob
import shutil
import tensorflow as tf
from tqdm import tqdm
import numpy as np
from os import makedirs
from matplotlib import pyplot as plt
from tensorflow.keras import Sequential
from tensorflow.keras.layers import Dense
from tensorflow.keras.layers import Flatten
from tensorflow.keras.layers import Dropout
from tensorflow.keras.layers import Conv2D
from tensorflow.keras.layers import MaxPooling2D
from tensorflow.keras.optimizers import Adam
from tensorflow.keras.preprocessing.image import ImageDataGenerator

print("Now Dir:", os.getcwd())
print("Tensorflow:", tf.__version__)
print("Num GPUs Available: ", len(tf.config.experimental.list_physical_devices('GPU')))
Now Dir: /usr/local/share_storages/lab
Tensorflow: 2.8.0
Num GPUs Available:  0
2. Dowload, Unzip and Verify dataset
Dowload dataset Cats&Dogs from https://www.kaggle.com/c/dogs-vs-cats/data and save into folder
/usr/local/share_storages/data/dataset/dogs-vs-cats.zipAfter unzipping the file. Structure as below with
train&test1folder including image dog, cat with .jpg friendly image format.
# 1. Unzip datasets
DATASET_PATH = '/usr/local/share_storages/data/dataset/dogs-vs-cats'
DATASET_ZIP_PATH = DATASET_PATH + '.zip'

zip_ref = zipfile.ZipFile(DATASET_ZIP_PATH, "r").extractall(DATASET_PATH)
zip_ref = zipfile.ZipFile(DATASET_PATH + '/train.zip', "r").extractall(DATASET_PATH)
zip_ref = zipfile.ZipFile(DATASET_PATH + '/test1.zip', "r").extractall(DATASET_PATH)
# Folder structure after unzip
share_storages
    ├── data
        ├── dataset
        ├── dogs-vs-cats
            ├── train
            ├── test1
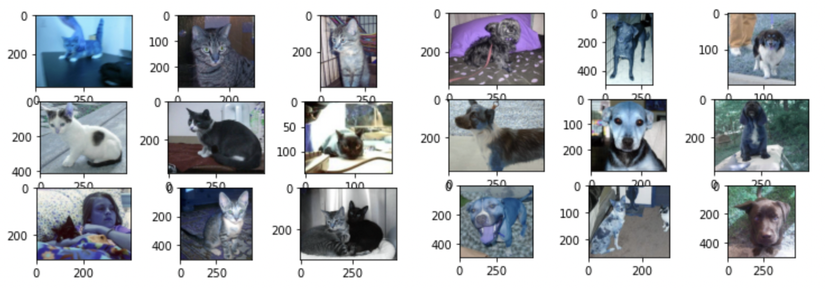
- See a few images from the dataset. It look good!
# 2. Show sample dataset
folder = '/usr/local/share_storages/data/dataset/dogs-vs-cats/train/'
for i in range(9):
    plt.subplot(330 + 1 + i)
    filename = folder + 'cat.' + str(i) + '.jpg'
    image = cv2.imread(filename)
    plt.imshow(image)
plt.show()
print('         ==============================')
for i in range(9):
    plt.subplot(330 + 1 + i)
    filename = folder + 'dog.' + str(i) + '.jpg'
    image = cv2.imread(filename)
    plt.imshow(image)
plt.show()
3. Prepare (train, val, test) dataset
There are 2 folders train and test1 so will use train folder for training and folder test1 will keep to get model test data after training is complete.
- Restructured the train folder for ease of use ImageDataGenerator
train_dataset_path = '/usr/local/share_storages/data/dataset/dogs-vs-cats/train/'
train_ratio = 0.75
sub_dirs = ['train/', 'test/']
class_dirs = ['dogs/', 'cats/']

# restructure for easy create dataset with ImageDataGenerator
for sub in sub_dirs:
    for class_dir in class_dirs:
        makedirs(train_dataset_path + sub + class_dir, exist_ok=True)
├── dataset
    ├── dogs-vs-cats
        ├── test1 -> using for benchmark model.
        ├── train -> using for training model (have been restructure for easy using ImageDataGenerator).
            ├── train
            ├── dogs
            ├── cats
            ├── test
            ├── dogs
            ├── cats
- Divide data from train folder into 2 parts
25%for validation and75%for training.
# Random 75% to train and 25% to test
cats = glob.glob(train_dataset_path + 'cat.*')
dogs = glob.glob(train_dataset_path + 'dog.*')
random.shuffle(dogs)
random.shuffle(cats)
cat_trains = cats[:int((len(cats)+1)*train_ratio)]
dog_trains = dogs[:int((len(dogs)+1)*train_ratio)]
cat_tests = cats[int((len(cats)+1)*train_ratio):]
dog_tests = dogs[int((len(dogs)+1)*train_ratio):]
print("Train with Dog: {}, Cat: {}".format(len(dog_trains), len(cat_trains)))
print("Test with Dog: {}, Cat: {}".format(len(dog_tests), len(cat_tests)))
Train with Dog: 9375, Cat: 9375
Test with Dog: 3125, Cat: 3125
- Finally move the image from the train folder to the created sub folder.
# Move data to new structure
for path in tqdm(cat_trains): shutil.move(path, train_dataset_path + sub_dirs[0] + class_dirs[1] + path.split("/")[-1])
for path in tqdm(dog_trains): shutil.move(path, train_dataset_path + sub_dirs[0] + class_dirs[0] + path.split("/")[-1])
for path in tqdm(cat_tests): shutil.move(path, train_dataset_path + sub_dirs[1] + class_dirs[1] + path.split("/")[-1])
for path in tqdm(dog_tests): shutil.move(path, train_dataset_path + sub_dirs[1] + class_dirs[0] + path.split("/")[-1])
100%|██████████| 9375/9375 [00:14<00:00, 634.46it/s]
100%|██████████| 9375/9375 [00:19<00:00, 492.49it/s]
100%|██████████| 3125/3125 [00:05<00:00, 599.48it/s]
100%|██████████| 3125/3125 [00:06<00:00, 485.41it/s]
4. Define CNN Model by Keras
# Set the default optimizer
default_opt = Adam(learning_rate=0.001)

#  VGG-3, dropout, and image data augmentation
def get_model():
    model = Sequential()
    model.add(Conv2D(32, (3, 3), activation='relu', kernel_initializer='he_uniform', padding='same', input_shape=(200, 200, 3)))
    model.add(MaxPooling2D((2, 2)))
    model.add(Dropout(0.2))
    model.add(Conv2D(64, (3, 3), activation='relu', kernel_initializer='he_uniform', padding='same'))
    model.add(MaxPooling2D((2, 2)))
    model.add(Dropout(0.3))
    model.add(Conv2D(128, (3, 3), activation='relu', kernel_initializer='he_uniform', padding='same'))
    model.add(MaxPooling2D((2, 2)))
    model.add(Dropout(0.4))
    model.add(Flatten())
    model.add(Dense(128, activation='relu', kernel_initializer='he_uniform'))
    model.add(Dropout(0.5))
    model.add(Dense(1, activation='sigmoid'))
    model.compile(optimizer=default_opt, loss='binary_crossentropy', metrics=['accuracy'])
    return model
5. Training, Evaluate and Save model
# load model
model = get_model()

# create data generators
train_datagen = ImageDataGenerator(rescale=1.0/255.0, width_shift_range=0.1, height_shift_range=0.1, horizontal_flip=True)
test_datagen = ImageDataGenerator(rescale=1.0/255.0)

# prepare iterators
train_it = train_datagen.flow_from_directory('/usr/local/share_storages/data/dataset/dogs-vs-cats/train/train/', class_mode='binary', batch_size=64, target_size=(200, 200))
test_it = test_datagen.flow_from_directory('/usr/local/share_storages/data/dataset/dogs-vs-cats/train/test/', class_mode='binary', batch_size=64, target_size=(200, 200))

# fit model
history = model.fit(train_it, steps_per_epoch=len(train_it),
    validation_data=test_it, validation_steps=len(test_it), epochs=50, verbose=1)

# evaluate model
_, acc = model.evaluate(test_it, steps=len(test_it), verbose=0)
print('> %.3f' % (acc * 100.0))
model.save('/usr/local/share_storages/data/model/cat-dog.h5')
...
Epoch 47/50
293/293 [==============================] - 803s 3s/step - loss: 0.2493 - accuracy: 0.8997 - val_loss: 0.2465 - val_accuracy: 0.9005
Epoch 48/50
293/293 [==============================] - 701s 2s/step - loss: 0.2411 - accuracy: 0.8997 - val_loss: 0.2225 - val_accuracy: 0.9134
Epoch 49/50
293/293 [==============================] - 654s 2s/step - loss: 0.2425 - accuracy: 0.8995 - val_loss: 0.2161 - val_accuracy: 0.9162
Epoch 50/50
293/293 [==============================] - 785s 3s/step - loss: 0.2380 - accuracy: 0.9017 - val_loss: 0.2153 - val_accuracy: 0.9158
> 91.584
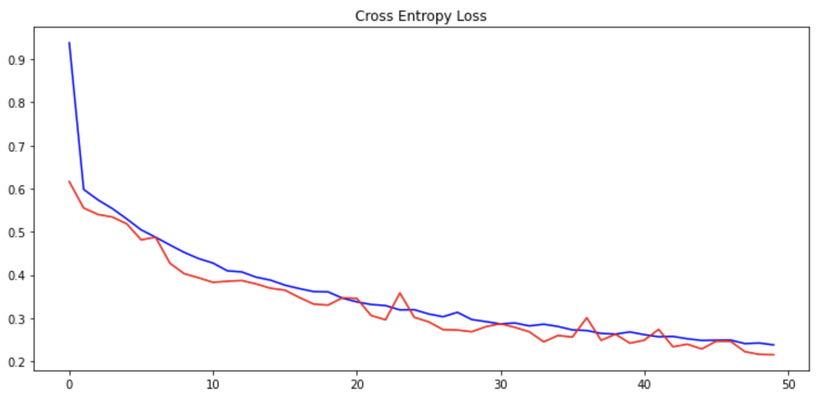
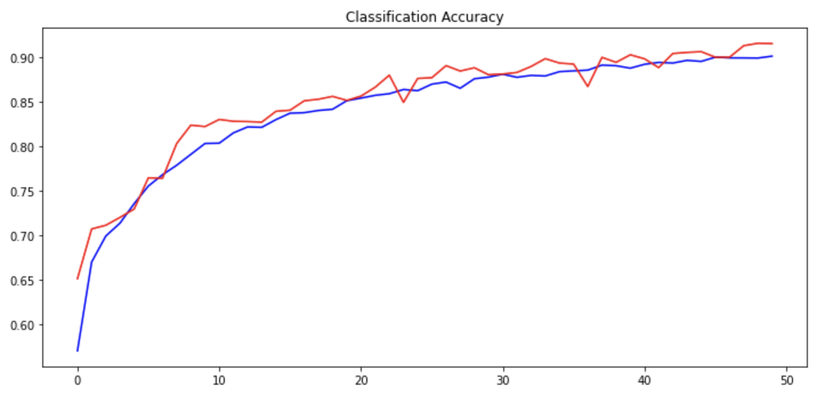
6. Sumarize Diagnostics
# plot diagnostic learning curves
def summarize_diagnostics(history):
	fig, axs = plt.subplots(2, 1, figsize=(12,12))
	# plot loss
	plt.subplot(211)
	plt.title('Cross Entropy Loss')
	plt.plot(history.history['loss'], color='blue', label='train')
	plt.plot(history.history['val_loss'], color='red', label='test')
	# plot accuracy
	plt.subplot(212)
	plt.title('Classification Accuracy')
	plt.plot(history.history['accuracy'], color='blue', label='train')
	plt.plot(history.history['val_accuracy'], color='red', label='test')
	plt.show()

# learning curves
summarize_diagnostics(history)
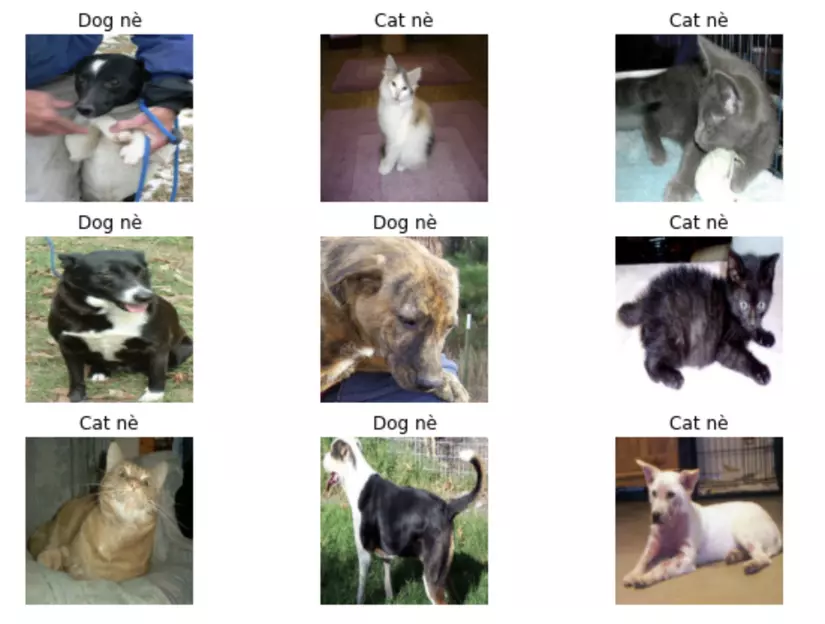
7. Test model
using folder /usr/local/share_storages/data/dataset/dogs-vs-cats/test1 Do not use during training to test.
IMAGE_SIZE = 200

# Preprocess an image
def preprocess_image(image):
    image = tf.image.decode_jpeg(image, channels=3)
    image = tf.image.resize(image, [IMAGE_SIZE, IMAGE_SIZE])
    image /= 255.0  # normalize to [0,1] range
    return image

# Read the image from path and preprocess
def load_and_preprocess_image(path):
    image = tf.io.read_file(path)
    return preprocess_image(image)

# load image paths
images_paths = glob.glob("/usr/local/share_storages/data/dataset/dogs-vs-cats/test1/*.jpg")

rows = 3
plt.figure(figsize=(10,7))
for num, x in enumerate(images_paths[0:9]):
    image = load_and_preprocess_image(x)
    pred = model.predict(np.array([image]))
    if pred[0] > 0.5: class_name = 'Dog nè'
    else: class_name = 'Cat nè'
    plt.subplot(rows,3, num+1)
    plt.title(class_name)
    plt.axis('off')
    plt.imshow(image)
plt.show()
What next?
Next is how to deploy the model in the project, you can refer to the article Serving ML Models in Production with FastAPI and Celery. Hope the information I share is useful.